Showing posts with label Craft project. Show all posts

Thursday, May 5, 2011

Mother's Day Project and Finishing a Journey!

We have our last "classroom" meeting of the school year tonight. The girls will be finishing their second journey, "Between Earth and Sky" and receiving their journey patches.

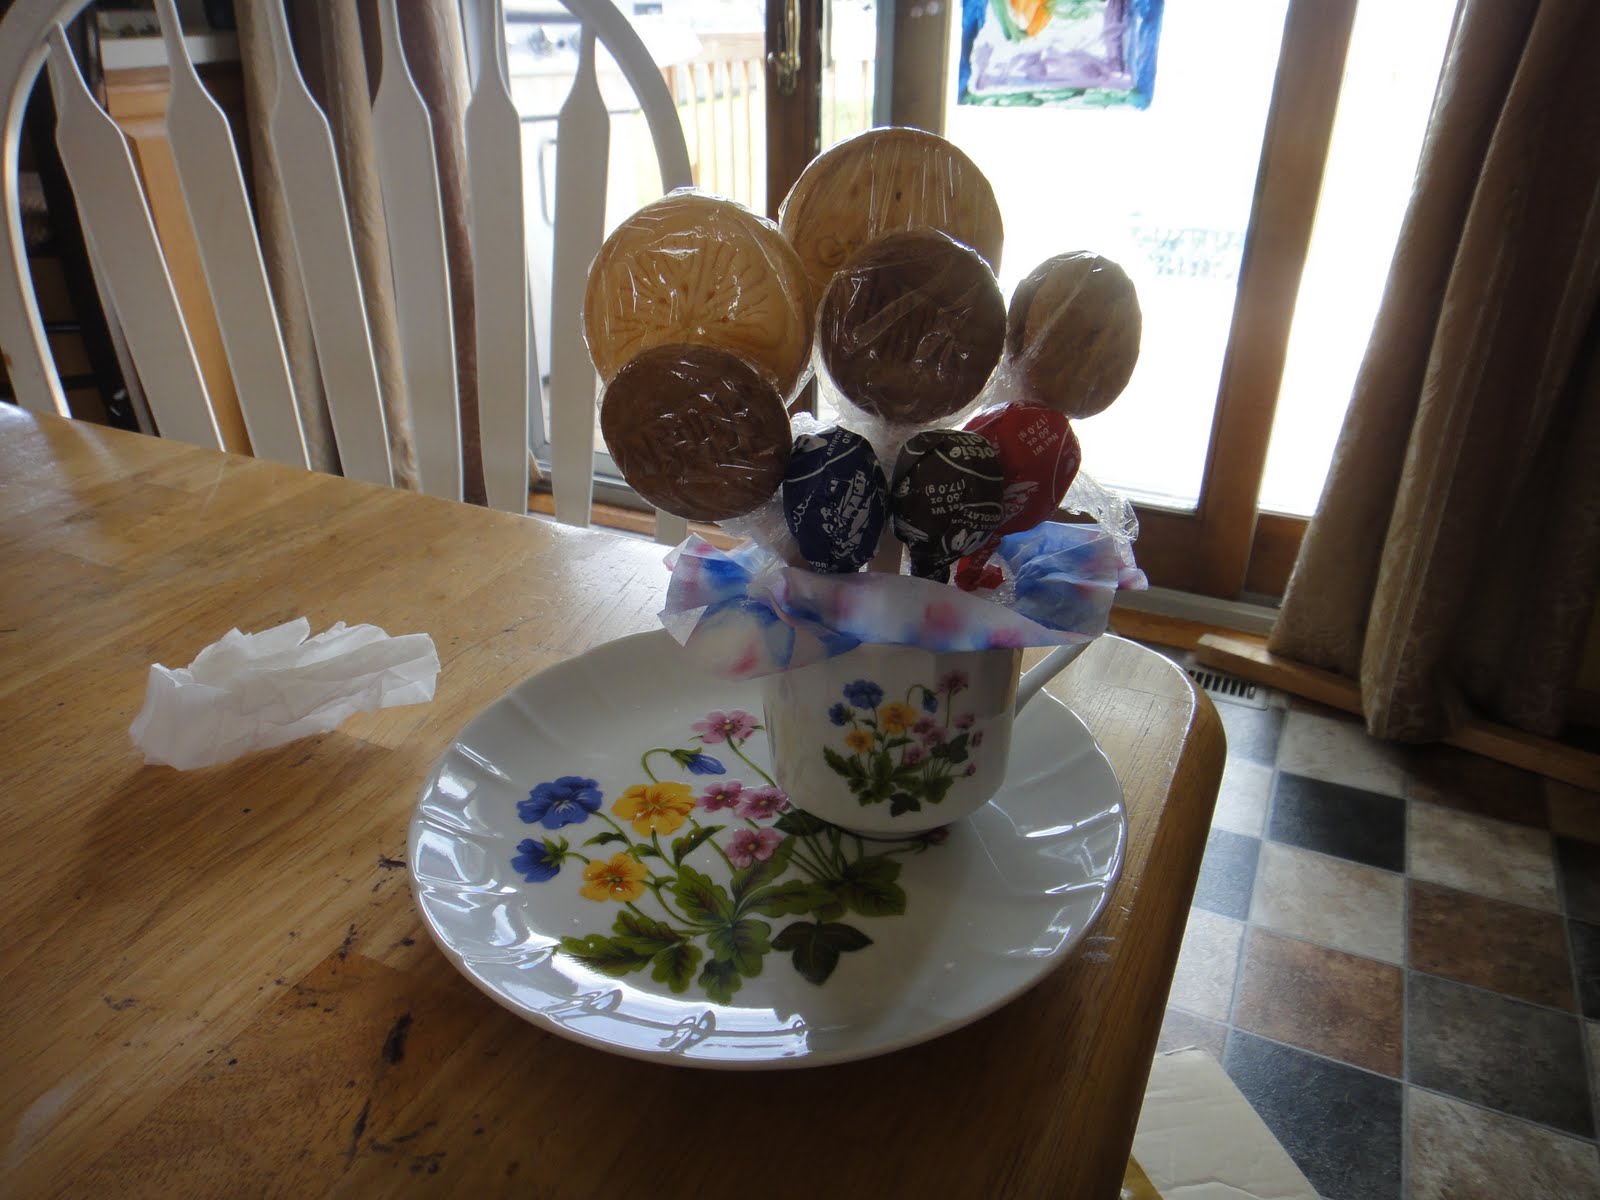
I am excited about our Mother's Day craft tonight. I had bought some old teacup and saucer sets when the service unit was trying to decide what to do for Thinking Day. We ended up not using them and that left me with 9 sets to find a use for. I also have left over GS cookies my troop paid for to use up, so I'm throwing them into the mix. I decided to try making teacup bouquets with the girls.

You will need:
Teacups/Saucers -- they don't have to match
Hot Glue Gun
Styrofoam Balls cut in half -- use a bread knife
Coffee Filters
Spray Bottle of Water
Washable Markers
Plastic Cling Wrap
Popsicle sticks
Cookies
Lollipops


The only prep work that is necessary before your meeting would be to cut the Styrofoam balls in half and to hot glue the cups to the saucers.

To start, give each girl a coffee filter (I have a huge package I got at the dollar store), flatten it out and have them each color a design around the outside edge. Now this is where I recommend having a second adult on hand. If you have a spritz or spray bottle you can just mist the coffee filters with water, it will make the markers run and look very pretty. They dry pretty fast. If you don't have a spray bottle, the girls can lightly flick water drops onto the filter to get the colors to run. This should be done on a paper towel to save the work surface and extra hands can help dab off extra water to speed drying.


I then placed the coffee filter into the teacup, trying to leave a little bit out. Place one of the halved Styrofoam balls into the cup. Depending on the size of the cup and the size of the Styrofoam balls, you may have to put it in dome-up or dome-down. I don't think it really matters which. Press it firmly down in, the coffee filter should create a kind of ruffle around the opening of the teacup.

The next step was to stick the lollipops and cookies in as the "flowers." The lollipops don't need anything done to them but the cookies do. I used 1 cookie with a Popsicle stick and then wrapped it tightly in plastic cling wrap. I considered tearing the cling wrap in advance but then I realized I'd have a huge mess on my hands, so I'm going to draft one of the troop volunteers to tear them off and keep them orderly.


After putting all the "flowers" into my bouquet I was done! It was a fun and easy craft and I hope the girls will really have fun with it. I have a lot of cookies for them to use if they want so the bouquets can be much fuller than the one I have pictured here. The best part is, if the girls want a treat tonight, we'll have cookies on hand!

Thursday, January 20, 2011

2010/2011 Daisy Cookie Exchange

When I planned our troop's Christmas party, I originally planned to have a small cookie exchange in my home and making "cookie" ornaments for the girls to put on their trees at home. Well, after the November leaders' meeting, I felt that I needed to invite the 2 other Daisy troops to our exchange. The girls in the other troops are all new to Girl Scouts this year and I wanted my girls to get to know them, after all, the law says: "...and be a sister to every Girl Scout."

I found a recipe to make play clay and color it with baking cocoa, my goal being that the ornaments look like gingerbread. Here is the recipe from FamilyFun magazine. The ornaments I made were basically a gingerbread girl and tinier gingerbread girl (I have a gingerbread family cookie cutter set.) Since our exchange was Mom & Me, I thought the ornaments should reflect that.

Our original date had to be canceled because of snow and because I had a bad case of the stomach flu. So finally we were able to hold the event after the first of the year. I was excited to have so many RSVPs but I was very upset to discover that I only had 16 usable ornaments -- and 22 RSVPs! At the last minute I went to Wal-Mart and found round treat containers, similar to tupperware that were only 12 for $1.00! So the girls decorated their new treasure boxes -- the funny thing was that exactly 16 girls made it to the exchange so we would have had enough ornaments after all.


Friday, October 29, 2010

Pom-Pom Pumpkins & Scrapbooking Freebies

We finished up our fall sales last weekend. And our troop was about to put over $500 in the bank. I'm so proud of my girls. Our troop meeting this week was a simple one. Since we started the hat/scarf sets last time, we needed to finish this week -- which is good since the weather here in South Dakota has been cold, windy and wet. I decided that the scarves are really a lot of cutting and not a lot of hands on work for the girls, so I asked my co-leader to take the moms and dads into our work room and make finish the scarves while I read Chapter 5 of Welcome to the Daisy Garden to the girls. I loved how the flowers each represent a color of the daisy petals we learned last year! After our reading lesson we started working on our pom-pom pumpkins. I found the idea and directions at domestifluff.com. You can find the directions on that site.
Pom-Pom Pumpkin
The only thing we changed on the pom-pom pumpkins was that we used green and brown pipe cleaners to tie off the bundle, using the ends to create a stem and curl of vine. I thought the difference in color from the orange yarn would make it easier to keep the girls from accidentally cutting the wrong piece of yarn.

I'd also like to offer a free digital scrapbooking set to anyone who would like it. I tried to encompass all the levels of Girl Scouts with this set: Daisy, Brownie, Junior, Cadette, Senior, Ambassador and Leader. There are bridging embellishments, word art, and Girl Scout awards among other things. The last items to be finished was the "recycled" alpha. I tried to make something that looks like a craft project I might actually make with my girls. I think this alpha really looks like something a Daisy troop could make. Let me know what you think. If you make any layouts, send me a copy and I'll post it if you want.
Girl Scouts Preview
Please go to my other blog to find the download link.

Friday, October 15, 2010

What a great meeting! No-Sew Hats project

I thought we had a great meeting last night. We started our meeting off by a question and answer period about our fall sales, which we started last week. I regret that I forgot to go through the Promise and Law with the girls. I will do better next time!

In the Daisy Journey we read Chapter 3, learning about Amazing Daisy and her cousins from all over the world. It was at this point that I realized I'd forgotten to bring the herb gardens with me to the meeting! I will do better next time! The girls' homework for next time is to draw a picture of what they think our gardens will look like as they grow.

Our Fashion project for this week was our no-sew winter hats. I found the patterns in an amazing book by Judy Ann Sadler called, Making Fleece Crafts.
Making Fleece Crafts
Most of the girls could not wait to get started on this project, but a few forgot their fleece. I was so proud of my girls! They offered to share extra fabric with each other and EVERYONE got to make a hat. It was so great! I don't have a picture to post yet because we weren't able to make our scarves last night. We will complete the set at our next meeting and get pictures I can post.
If you would like to download my instructions for this project in pdf format, please click here.

Friday, October 1, 2010

Much better!

Our second meeting of the year was so much better than the first! We started out with practicing the Promise and the Law together. The girls are getting pretty good at them, although more than one has problems holding up the 3 fingers.

Next, the F. earned her "Animal Tracks" patch. She told us about her family vacation to North Dakota where they went to the National Fish Hatchery and on nature hikes. With the help of her mom, F. found the tracks of animals like deer. Then the made a circle out of poster board--using paper clips to hold it together, and then mixed plaster of paris. (F.'s mom brought the p.o.p. pre-measured in plastic bags, then added bottled water and mixed it when needed.) We were able to see the tracks of the deer very clearly.

We were able to read Chapters 1 and 2 from our journey books. The girls are assigned to do the workbook pages of those chapters as homework for our next meeting. I think I'll send out an email reminding them about a week before our next meeting. We also planted our herb gardens. I was able to buy 4 herb garden kits at a local store when they were clearanced at the end of summer. The herbs in each garden are Lavender, Oregano and Thyme. The girls worked together to plant the seeds. I will keep the gardens here at my house transporting them to each meeting so the girls can see the plants' progress.

Our craft this week was to finish the pincushion sewing kits we started last week. Last week the girls chose the fabric they wanted to cover the pincushion. We then glued it onto the Styrofoam and then to the lid of the little plastic containers. This week the girls glued a ribbon around the edge of the Styrofoam (pinning it in place until dry) and then I gave them each 2 tiny spools of thread for their kits. Here is a picture of my pincushion sewing kit.
Pincushion Sewing Kit

I also handed out the fleece water bottle carrier bags. My daughter and I sewed them at home and then cut the fringe in for each girl. The girls' job now is to tie the fringes to complete the bag. Once they have brought it to show me they have completed it, they will receive a patch with their name and troop number to glue on to their bag. This will be the second of their 5 fashion projects towards earning their fashion patches.
Fashion Patch

Monday, September 27, 2010

The first meeting of the year is always the worst!

We had our first meeting of the year last week, and I felt like it was pretty chaotic. The girls were excited to see each other and so I had a hard time getting them calmed down and focused on the meeting. We started out by talking about the summer and practicing the promise and the law. Then we started the Daisy Journey book, working through the character introductions and workbook pages. We officially started our simple sewing projects with our pin cushions and water-bottle carrier bags. The sewing machines were not all agreeing with us, so it was interesting to say the least.

I look forward to our meeting this week where Faith will earn her individual patch for animal tracks, we will read the first chapter of the book, plant our herb gardens and finish our pin cushions by gluing a fancy ribbon around them. I purchased a small sewing kit with enough mini-spools of thread to give the girls each 2 colors. I would like to give them each a needle-threader but have yet to find that many of them.

Rather than transport the sewing machines back and forth, which seems to upset how well they run, Sammi and I sewed the water-carrier bags and they are now ready for each girl to do her tying and glue on her patch identifying it as hers.

Friday, August 27, 2010

Starting our second year!

We are getting ready to start our second year together as a troop! It's so exciting. There are so many ideas bouncing around in my head. We will start this year with our first Daisy Journey, "Welcome to the Daisy Flower Garden". The journey book will teach us about becoming leaders.
journey book
We will also be learning to do basic sewing. Our first project will be making pincushions using this design:
Pincushion Jar
Click here to see the full tutorial on CraftPudding.
The only difference is that I will be using small plastic jars instead of baby food jars. The plastic jars are much less breakable and so are better suited to the girls. I plan to have the girls work on their pincushions at our first meeting in September after we finish our work in the Journey books. I am also planning to have 2 or 3 sewing machines at the meeting so that the girls can start working on their water bottle carriers.
The carriers are made from fleece. I think fleece is nice to start with since it doesn't fray. The girls will sew a simple zig-zag seam to make the bag and then can cut the fleece to tie the sides into "tassles". You can click here to see a .pdf with instructions. They are rough instructions as I created the project as I went yesterday.
I think that our troop will have nice results taking turns working on projects. The projects will take more than one meeting but that is okay, since girls sometimes have to miss meetings.

Here are some of our goals for 2010-2011:
1. Complete "Welcome to the Daisy Garden" journey
2. Complete 5 simple sewing projects
a. make a pincushion
b. make a water bottle carrier
c. make a pillow
d. make a SWAP sash
e. make a bean bag frog
3. Complete "Between Earth and Sky" journey
4. Host a SWAP

Monday, August 16, 2010

Daisy/Brownie Camp 2010

The girls
The first weekend of August 4 girls from my troop attended Daisy/Brownie camp with 20 other girls. It was quite an exciting 3 days! The Brownies and the older Daisies who are bridging to Brownie this year were working for 3 Try-Its, Art to Wear, Science in Action and Colors & Shapes. Each Try-It requires 4 projects to complete. My girls cannot earn Try-Its yet, so I found corresponding patches for them online: tie-dye t-shirts, science and painting (art).

We started Friday off with setting up camp and then assigning girls to the tents & tent moms. Each girl was also given a number to help us identify her projects. I had my daughter, 2 girls from my troop and the daughter of another leader who couldn't stay on the campsite (no dads are allowed to be tent dads.) We made our first project, permanent sand-castles (Colors and Shapes). Permanent Sand Castles
Then we had a very nice woman come and talk to the girls about constellations, they drew their own star charts and then she drew a large star chart on the sidewalk for them. Our snack was banana boats.

Banana Boats:
Large bananas still in the peel (greener ones work better)
Chocolate chips
Marshmallows
Granola
Berries
Slice the bananas length-wise, but not all the way through. Have girls fill the bananas with their choice of toppings -- not too full! Then tightly wrap the bananas in foil. Place bananas into the coals of the fire for at least 5 minutes before serving.

Friday night was a true test of our campers, the winds coming off of the lake were so strong! Carey's tent half-collapsed during the night and she moved her girls to Loretta's tent. In the morning her tent blew all the way down, and as it had been serving as a wind block for my tent, my tent went down too! Loretta's tent ended up collapsing too. We started the day with tie-dyed t-shirts (Art to Wear). I taught them and by the time I was done my whole left hand was purple! I showed the girls the different ways to tie their shirts and after they did the tying, the tent moms helped with the dying. We did learn that we should have washed the shirts first, as the sizing prevented the dye from soaking right in. After the shirts were dyed, we wrapped them in plastic wrap and marked them with the girls' numbers. They were left in the sun for the rest of the day to cure.
Tie-dye curing in the sung

Nila came up from Sioux Falls and brought a bounce house for the girls. We tried to have stuff available to keep them busy during their downtime since laying down in the tents wasn't an option. While the girls were playing in the bounce house and blowing bubbles, I enlisted the help of Bridget and Emily in pulping the shredded paper I brought. We pulped the shredded paper and the wood shavings in 2 old blenders. Be sure to put a lot of water into the blender so it doesn't get locked up.
Photobucket
All the pulped paper was dumped into a large plastic bin to soak and soften until we were ready to start the project after lunch. After lunch 1/2 of the girls went to work on Pounded Flowers (Colors & Shapes), and the other half came to work with me on Paper Making (Science in Action). To give each girl a chance to make her own individual sheet of recycled paper, I started with 2 dozen wooden frames I picked up at the dollar store. Becke and I removed all of the glass and metal from the frames and then I stapled sheets of window screen to the back of the frames. I used animal screening because it was cheaper than aluminum screening but also because I was worried that the aluminum would have sharp edges. Each girl received 1 frame with her number written on it. Then I dumped 3 or 4 scoops of pulp onto it and let the girls spread it out and squeeze out as much water as possible. Once the girls felt their paper was perfect, they were laid out in the sun to dry.
Sammi & I with her paper
The left-over paper pulp was dried as much as possible and then Carey, Nila and I formed it into balls (about the size of baseballs) to use as fire starters at camp.
That afternoon we took a nature walk with the girls, which was a nice treat, as the trails were much cooler thanks to all the shade. At the butterfly garden we found a leopard frog, which was the highlight of the hike.

Saturday evening we noticed the barometer dropping and were really worried about storms. The police told us the winds were supposed to drop off and the skies were supposed to be clear, so we stayed at camp. We did decide to try to finish up early the next day because the heat index was supposed to be in the high 90s. So the plan for Saturday night was to break the girls up into small groups and rotate through activities. Loretta taught the girls to make Mobiles (Colors & Shapes), Brandy taught the girls to make Friendship Bracelets (Art to Wear), Carey helped the girls rinse out their t-shirts,
Rinsed t-shirts

and I taught the girls to make Lava Lamps (Science in Action) and Color Plates (Science in Action).
Lava Lamp
Lava Lamps:
Fill a pint jar 1/2 full with water
Add 2-3 drops food coloring
Fill jar to within .5 inches of the top with cooking oil or mineral oil
Drop in 1/4 tablet of alka-seltzer and watch the "lava" action
I used the lava lamps as a chance to talk to the girls about the oil spill in the Gulf of Mexico and why it is so important to keep our oceans clean.
Color Plates:
Color Plate
The girls each colored a paper plate that had been divided into 8 sections and had 2 holes punched in it close to the center. Once colored a string could be put through the holes to create one big loop. The idea is to twist the string tightly so that as it unwinds the plate spins, creating the optical illusion of "mixing" the colors of the rainbow back into white. The demonstration plate didn't work out so well, but Jeanette, Emily and I were quick to come up with a solution. The plate was taped to a lazy susan and spun back and forth very quickly. The girls said they saw the illusion of white.

The next morning we needed to accomplish tearing down camp, finishing the Colors & Shape Try-it and the Science in Action Try-it. After camp was torn down I took the girls and had them start on autograph books. To incorporate colors and shapes, I had them each make a crayon rubbing of a small leaf on a page of the autograph book and sign their name. We passed the books around in a cycle to ensure every girl worked on every book.
Autograph books/leaf rubbings
It was time consuming but it allowed Loretta to make the Ooblek Goop for our last Science in Action activity. The girls loved the goop, especially since Emily had read Bartholomew and the Ooblek by Dr. Seuss to them the day before. It was probably the most popular project of the weekend. Thankfully the girls all got home before the heat set in and we had camp cleaned up before the heavy rains started.
Friday, April 23, 2010

Month #8 -- Earning our Green and Rose Petals

Our meeting this month was on Earth Day, and I thought it was the perfect day to learn about and earn our Green and Rose petals for using our resources wisely and making the world a better place. I started the meeting by talking with the girls about what Earth Day is. Most of them had learned about it in school and grasped the concept pretty well. We then started talking about recycling, I was very happy to hear that most of the girls do some sort of recycling with their families. I handed out recycling stickers for them to label their recycling bins. These stickers are available for free at our library and are sponsored by our Municipal Utilities. We then began to talk about reusing items that can't necessarily be recycled. An example I gave them was of the fairy house I made with my daughters out of an old orange juice jug. We hot glued all kinds of found objects to the jug, anything bright and shiny that our local fairies might like (glass pebbles, marbles, sea shells, old jewelry, beads, mirrors, etc). The girls then placed the fairy house outside and we waited for a garden fairy to move in. This project allowed us to use a jug in a new way, decorating our yard instead of throwing it in the local landfill.
Our Fairy House
The girls and I then talked about how taking care of the Earth can make the world a better place. If we practice good habits like picking up litter, we might brighten someone else' day or inspire them to pick up a piece of litter too.
Our craft project this week was to create Bird Nest Kits. We wanted to reuse a seemingly useless item from our everyday lives. The girls agreed with me that nests made out of sticks might be pokey to sit on, so we thought the birds could use our old dryer lint to line their nests. I found this project in an Earth Day Craft book, the original instructions saying to use milk cartons. Since part of the lesson was to use resources wisely, I explained to the girls that I didn't have any milk cartons, but I did have miniature cereal boxes. Before the meeting I asked the parents of the troop to save their dryer lint and bright pieces of string. I then cut "windows" into the broad sides of the cereal boxes. At troop meeting, the girls stuffed their boxes with their dryer lint. Some girls forgot their dryer lint or did not have enough to fill the box, so we shared. The boxes were then tied with hemp cord so that the girls could take them home and hang them from their trees.
Bird Nest Kit 2
Unfortunately, less than half of my troop attended this meeting, so I sent out e-mails asking them to work with their parents on a project that recycles or reuses household items we would normally throw away. The girls will officially earn their petals when they tell me about what they made with their mom and dad. The girls have no rules on these projects except that we don't want to pollute our yards if we can help it. We should try to use items that will degrade naturally like papers, cardboard, natural strings and glues.

Friday, January 29, 2010

Month #4 -- Earning our Light Green Petals

This month we needed to talk about earning our Light Green petals as well as prepare for our Red petals. Two of the girls in the troop missed the meeting in December, so I decided to read a story to the girls that had lessons about being considerate and caring as well as being brave and strong. I felt that the fable The Lion and the Mouse would fit perfectly. I started out by asking if the Lion was brave and strong, the girls agreed, but they also agreed that he didn't have to be nice to anyone if he didn't want to, since he is the king of the jungle. They thought the Mouse might be caring but since mice always run away and hide, they aren't very brave. At the end of the story the girls saw that the Lion had tried being considerate and caring and the Mouse had found courage. To back up the lesson, I created a bookmark as our craft. The girls colored and cut out the bookmark. When the bookmark is closed the Lion says, "I can be considerate and caring" and the mouse sits at his feet. When the mouse is pulled down, the message "and I can be courageous and brave." apears. Click here if you for the PDF would like to use this craft. For homework I asked the girls to find a new exercise to learn, reminding them that exercise makes their bodies strong. For example, Sammi wants to learn to hula hoop.

Tuesday, December 29, 2009

Month #3 -- Earning our Yellow Petals

We started this meeting by practicing the Girl Scout Promise. For less than $1.00 I bought a sheet of poster board and wrote out the Promise and the Law. I read the Promise to the girls once and then asked them to read it aloud with me. To earn our Yellow Petals, for being friendly and helpful, the girls were supposed to help out around the house without being asked. Most of the girls were able to give specific jobs they had helped with at home. Their moms were usually able to tell me if they had done well or not.
We then moved on to a story to help them thinking about our next petal, light green for being considerate and caring. Since this was our December meeting I chose to read them a story about Christmas. I chose a wonderful book about a bear who stays up after everyone else has gone to bed and makes presents for all of his friends, even though he can barely keep his eyes open. I started the conversation with them about what we care about this time of year and how to be considerate to families who are less fortunate. Each girl was given $0.50 to place in a Salvation Army bucket. I will ask the girls at the next meeting whether they kept the money for themselves or if they shared it with a family who could really use it.
Our craft for this month was to make Christmas ornaments. I would like to start a tradition with the girls in my troop. Every year they will make a new ornament that symbolizes what we are working on that year. This year I fell in love with some penguins made out of socks. I did have to do most of the prep work -- stuffing and sewing the socks, cutting out the felt pieces and as a special gift to the girls I made bead daisies for their ornaments to wear as necklaces.
Here is a picture of Sammi with her ornament. She colored his gray parts with a black fabric marker, but he's still pretty cute.
Sammi & Her Penguin
And you can download the instructions to make this ornament here, it is a PDF file.

Tuesday, November 10, 2009

SWAP Meet this weekend!

I am getting very excited for our first SWAP (Share With a Friend) Meet. The idea is to make something unique to our troop and trade it with girls from other troops. Since we are Daisies, we needed to make something very simple not too hard for little hands. The solution is bag SWAPs. I looked on line at sites like these for ideas:
www.gsswaps.net
www.makingfriends.com/swaps
www.scoutingweb.com/scoutingweb/program/craftswaps.htm
We (Sis and I) tossed around ideas like rainbow seeds or friend seeds, and went to the store to see what was available. Sis saw some cute little white puffballs with silver tinsel sticking out of them and asked if we could please use those. But what to call them?? I thought about it for about a week and it occured to me that we could make our SWAPs into a wish for a silver lining when a friend feels down. Here is our finished SWAP.
SWAP,SWAPs
The girls seemed to get the idea of wishing for a silver lining on a sad day and they were so fast at putting them together. I prepared for the meeting by counting out what each girl would need to make 20 SWAPs and seperating them into bags for each girl. They finished during the meeting so they didn't have to take any work home. There was also enough supplies to make SWAPs to send to our Sister-Troop in Danville, Kentucky.
I know the girls will have a great time meeting new girls and getting new SWAPs.

Thursday, October 22, 2009

Month #1 -- Earning the daisy center.

Tonight we're having our first official troop meeting. I will be working with the girls on earning our daisy center. Most of the online GS sites I've read recommend making bracelets with beads the color of each of the petals for this goal. I was planning to have the girls make nametags tonight, and it occurred to me that we could incorporate the beads into that project. I am also hoping to start working lessons like "use resources wisely" and "make the world a better place" into each project we do. For example, our nametags start with a recycled piece of plastic. The plastic comes from the library cards at work. When the cards come to us they are secured in a sheet of 6 -- each card actually being 2 pieces, a wallet card and a keychain card. We normally cut the plastic braces apart and discard. As a joke, a coworker suggested we should find a craft to make out of them. Inspiration struck at just the right moment, and I saw the beginnings of our nametags.
I cut and glued cardstock to the plastic braces using a craft glue, and then let it dry. Then I wrote the girls' names in the top section, leaving the large opening for the girls. My plan is to give the girls markers and ask them to do whatever they like on their nametag. They can write their name again or draw pictures or both. Whatever makes them happy. Then we will insert cords through the punched holes, stringing beads as we go. I prepared enough nametags for the girls, my assistant and for myself. As well as one extra, just in case.